Saturday, March 24, 2012

Wet n Wild's blue had me at hello & Cool as a cucumber combo eyeshadow tutorial...

Hey Everyone! So as I said this morning, I wanted to share with you a eyeshadow look that I just created. It's using Wet n Wild's Blue had me at hello in combination with Cool as a Cucumber. And I took my pictures with my computer's webcam today, because my camera batteries are dead. So as usual I'll show you what I used for my entire face makeup and I'll list the products, then I'll get into the tutorial.


Ok, so here's the products I used on my face:

FACE:

  • Smashbox photo finish light face primer
  • Milani multi-tasker face powder
  • Sei Bella Tinted Moisturizer in Fawn
  • Benefit Hervana Blush

And here's what I used on my eyes:

EYES:


  • Too faced shadow insurance
  • Maybelline eye studio color tattoo cream eyeshadow in Bad to the Bronze
  • Wet n Wild Blue had me at hello eyeshadow palette
  • Wet n Wild Cool as a cucumber eyeshadow palette
  • Covergirl professional all in one mascara in Blackest black

and lastly, what I used on my lips:

LIPS:

  • Sun shades lip balm in vanilla bean
  • Revlon colorburst lip butter in Pink Truffle


ok, so here's the tutorial:


ok, the first thing I did was I primed my eyes with too faced shadow insurance. Then I applied Maybelline eye studio color tattoo cream eyeshadow in Bad to the bronze. I blended that shadow out with my fingers and then went to my Wet n wild blue had me at hello palette. I took a flat eyeshadow brush and took the dark blue shade 3 colors down on the right side of the palette. I then blended that out, and taking a crease brush I went to Wet n wild's cool as a cucumber palette. And I took the purple shade in the middle of the palette. I then blended that out with the same crease brush. To complete my look I applied covergirl professional all in one mascara in blackest black to my top and bottom lashes. But to complete my entire makeup look, I applied sun shades lip balm in vanilla bean and revlon colorburst lip butter in pink truffle over the top of the lip balm.


Well thats it! I hope you enjoyed this tutorial and I hope you'll try it out :) I hope you have a great day!

Reviews on Smashbox Photo finish light face primer and Too faced shadow insurance...

Hey everyone! I hope y'all are having a great Saturday morning! I just wanted to share with you all a long overdue review of Smashbox Photo finish light face primer and Too faced shadow insurance.


I'll start off with a review on Smashbox photo finish light face primer. I love this primer! I bought the travel size last year, so I could just try it out and see if I liked it. The travel size cost me $15.00, but it was worth it! This primer claims to be great for people with acne-prone skin, oily skin and sensitive skin. It is oil-free and it's 60% water based so when you apply it, it refreshes on contact and the little oil absorbers provide a smooth, matte finish all day. So those are the claims and I think it lives up to those claims. However, I don't think it keeps your face matte all day. I put this on in the morning around 8am and by the time I get home around 9pm, my forehead looks and feels like an oil slick. I have oily skin in my T-zone, I'm acne prone and my skin is sensitive. So by the middle of the day, my skin feels oily.

So that would be the only con to this primer, everything else about it I love. Accept for the $15.00 price tag. The full size of this product costs $36.00 and I'm not willing to pay that much. But anyways, this primer has lasted me for a long time. I purchased this in August of last year and I'm just now starting to run out of it. So overall, I love this primer! There are just a couple cons that I have, but otherwise it's great!


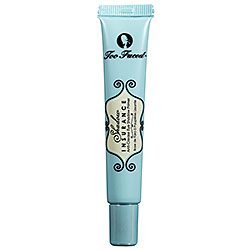
Ok, moving on to Too Faced shadow insurance eye primer. This is amazing! I use this every morning to prime my eyes before putting on my eye makeup and I have to say it keeps my eyeshadow on all day! It keeps it looking fresh and my shadows don't crease. Again the only thing I would have to say that I believe is a con, is the $18.00 price tag. I mean, for a good primer I think its worth it. But I know that some people are on a tight budget and can't fork out those $18.00 for a primer, me included. So I would love to find something thats a low cost alternative and I have yet to find something. But again, its lasted me an incredibly long time. I bought this the same time I bought the face primer in August of last year and I still haven't run out yet, though I think I'm getting close unfortunately. And also if you're wondering, it does come in a tube. Which I think is very helpful, because when you start getting low you can make sure youre getting all the product out with the squeeze tube. The same thing goes for the face primer, it is also a squeeze tube.


So thats my review of those products! I think they're great products I just think that the price could be less. Please let me know if you've found a low cost alternative to either of these products, I would be so happy! Thanks for reading and I'll be blogging again soon! I actually will do another eye makeup tutorial I think later today, so keep your eyes out for that. Have a great day!

Wednesday, March 21, 2012

Wet n Wild Vanity eyeshadow palette #3.....MATTE EYES!!!

Hey everyone! Sorry its been a few days since I've done a blog. Things have been really busy with school and such. But anyways, I just put on my makeup for the day (I know its almost 2pm) and I used Wet n Wild's Vanity palette yet again, but this time I used the matte side of the palette. So here's the products I used and then I'll get into the tutorial.


Here are the products I used for my face makeup:

FACE:

  • Smashbox Photo Finish Light face primer
  • Milani Multi-tasker Face powder
  • Sei Bella Tinted Moisturizer in Fawn
  • Benefit Hervana Blush

Here are the products I used for my eye makeup:

EYES:

  • Too Faced Shadow Insurance
  • Maybelline Color tattoo cream eyeshadow in Tough as Taupe
  • Wet n Wild eyeshadow palette in Vanity
  • Maybelline new york master drama eyeliner pencil in Vibrant Violet
  • CoverGirl professional all in one mascara in blackest black

And finally, here are the products I used on my lips:

LIPS:

  • Sun Shades Lip Balm in Vanilla Bean
  • Revlon Colorburst lipstick in petal


ok, so now that I've listed all the products I used, lets get into the eye makeup tutorial:


So the first thing I did was I primed my eyes with Too Faced shadow insurance, I let that dry for about 10 seconds and then I applied maybelline color tattoo cream eyeshadow in Tough as Taupe. I blended that shadow out with my fingers. I then went to my Wet n Wild palette in Vanity and taking a flat eyeshadow brush, I placed the cream white shade on the right side of the palette to my browbone. I then took the matte chocolate brown shade with the same flat shadow brush and I placed this shade on my entire lid. I took a crease brush and blended that out. Then taking same crease brush, I went to the lighter brown shade and applied it to my crease. After I blended that out, I lined my upper lash line with maybelline eye studio master drama eyeliner pencil in Vibrant Violet. And finally, to complete my eye look I applied covergirl professional all in one mascara in blackest black to my top and bottom lashes. To complete my entire look I applied to my lips sun shades lip balm in vanilla bean and after that moisturized my lips I applied revlon colorburst lipstick in petal over the top of the lip balm.


And thats it!! I thought that it was a really simple look and I wanted to share with you all. I hope you'll try this look out :) and please let me know what you think :) Have a great wednesday afternoon!

Sunday, March 18, 2012

Wet n Wild Walking on Eggshells eyeshadow palette tutorial...

Hey guys! I hope y'all are having a great Sunday afternoon! I wanted to share with you another makeup tutorial using Wet n Wild's Walking on Eggshells eyeshadow palette. This is a really simple, natural look. I wore this look yesterday and I really liked it, so I created the look again today for church this morning. So as I've always said I'll show you what I used for my entire face makeup and then get into the tutorial. So lets get into the tutorial....
So here's what I used for my face makeup:


FACE:


  • Smashbox Photo Finish light face primer
  • Milani Multi-tasker face powder
  • Sei Bella Tinted Moisturizer in Fawn
  • Benefit Hervana Blush


Here's the products I used for my eye look:


EYES:

  • Too Faced Shadow Insurance eye primer
  • Maybelline color tattoo cream eyeshadow in Tough as Taupe
  • Wet n wild walking on eggshells eyeshadow palette
  • Covergirl professional all in one mascara in Blackest black

And finally, here's the products I used on my lips:

LIPS:

  • Sun Shades Lip Balm in Vanilla Bean


So here's the tutorial:


So first I applied my too faced shadow insurance eye primer and let that dry for about 10 seconds, then I applied maybelline's color tattoo cream eyeshadow in Tough as Taupe. After I blended that shadow all out, I went to my wet n wild walking on eggshells palette and taking a flat eyeshadow brush, I applied the light pink shade over the top of the tough as taupe cream eyeshadow. Then I took the same flat shadow brush and I applied the white pearly shade on my browbone. After I blended those shadows out, I took a crease brush and applied the medium teddy bear brown shade to my crease. And taking the same crease brush, I blended that shadow out. To finish my eye look, I applied my covergirl professional all in one mascara in blackest black to my top and bottom lashes. Lastly, to complete the entire look I went with a subtle lip balm sun shades lip balm in vanilla bean. As I've always said, the staying power of these shades is amazing! I applied this makeup at 7:00am this morning and I probably won't take it off until 8:00pm tonight. As I look at it now, it still looks like I just applied everything! So I'm really happy with that :)

And thats it!! Pretty simple I think. And I think its a really pretty look that you can wear everyday or you could dress it up with a liner and have it be a more dramatic, night out look. I hope you enjoyed this tutorial and I'll be postig more reviews and tutorials soon! Have a great Sunday everyone! :)

Wednesday, March 14, 2012

Wet n wild Vanity eyeshadow palette tutorial #2.....

Hey everyone! I hope you're having a wonderful Wednesday morning despite the rain :) Anyways, I wanted to share with you another tutorial using Wet n Wild's Vanity palette. I love this look I created, its very sultry yet natural. So lets get into the tutorial:
Here's what I used on my face:


FACE:

  • Smashbox Photo Finish light face primer
  • Sei Bella Tinted moisturizer in Fawn
  • Milani multi-tasker face powder
  • Benefit Hervana blush

Here's the products I used for my eye look:

EYES:

  • Too Faced Shadow Insurance eye primer
  • Maybelline eye studio color tattoo cream eyeshadow in Bad to the Bronze
  • Wet N Wild eyeshadow palette in Vanity
  • L.A. Girl FineLine liquid eyeliner in Black
  • CoverGirl professional all in one mascara in Blackest Black

And lastly here are the products I used on my lips:


LIPS:

  • Sun Shades Lip Balm in Vanilla Bean
  • Revlon Colorburst Lip Butter in Pink Truffle

Ok, so those are all the products I used for this look and here's how I created this look:


I first primed my eyes with Too faced shadow insurance, after I let that dry for about 10 seconds I applied Maybelline eye studio color tattoo cream eyeshadow in bad to the bronze. I then patted that shadow so that I could make sure it was blended and applied evenly across my entire lid. After that dried, I went to my Vanity eyeshadow palette and using a flat shadow brush, I took the shimmery brown shade on the right side of the palette. Then using a crease brush, I applied the darker brown matte shade on the left side of the palette in my crease. I then blended that out using the same crease brush. I then applied my L.A. Girl FineLine liquid eyeliner in black to my upper lash line. Lastly I applied my CoverGirl professional all in one mascara in blackest black to my top and bottom lashes. To complete the entire look, I applied my Sun Shades lip balm in Vanilla Bean to my lips. I then went over that with my Revlon Colorburst Lip Butter in Pink Truffle.


Ok, thats it! Its very simple, yet sultry and very natural. I hope you liked this tutorial and I hope y'all with try this look out :) Have a great day!! :)

Monday, March 12, 2012

Wet n wild's vanity eyeshadow palette review....

Hey everyone! I hope you're having a great Monday afternoon! I just wanted to share with y'all my review on Wet n Wild's eyeshadow palette in Vanity. This is a 6 color palette and I actually really, really like this alot! The reason being is that one side has three shades that are totally matte and the other side has three shades that are shimmery.


You can refer to my latest post for a tutorial I did using this palette. The shades in this palette are very pigmented and rich, they blend super easy and the color pay off is excellent! I applied my makeup on Saturday at about 12pm and didn't remove it until about 11pm that night. And all the shadows stayed perfectly fine and still were really rich in color. So I'm very pleased with that. You can pick this up at Walgreen's for around $4.99. I think for the price and the quality of these shadows, every woman should have at least one of these palettes in their collection! If you pick one of these up, you won't be disappointed! Well,  thats it for my review of Wet n Wild's Vanity palette. I hope y'all have a great night! Keep your eye out for more reviews and tutorials using the wet n wild eyeshadow palettes coming soon! :)

Saturday, March 10, 2012

Wet N Wild Vanity Palette Tutorial....

Hey everyone!! I hope you are having a great Saturday morning! I just wanted to share with you a look I created using Wet N Wild's Vanity palette. This look is a very sexy, sultry look that I feel is for a night out. I'm going to a concert tonight and I wanted something a litte darker and sexier than a nude eye look, so I came up with this! Orginally, I was going to use wet n wild's blue had me at hello palette but it didn't turn out how I wanted, so I went with the vanity palette. So lets get started...

I'll show you my full face makeup and what I used as well.


Ok, so here's what I used for my face makeup:

FACE:

  • Smashbox Photo finish light face primer
  • Sei Bella Tinted moisturizer in Fawn
  • Milani Multi-tasker face powder
  • Benefit Hervana Blush

And here's the products I used for my eye look:

EYES:


  •  Too Faced Shadow Insurance Eye primer
  • Wet N wild Vanity Palette
  • L.A. Girl FineLine liquid eyeliner in black
  • Covergirl professional all in one mascara in Blackest Black

Also, here's what I used on my lips:

LIPS:

  •  Revlon Colorburst Lip Butter in Pink Truffle


Ok, so there's the list of products I used. Now lets get into the tutorial:


So using a flat eye shadow brush, I used the shimmery brown shade on the right of the palette and I placed this all over my lids. Next, I used my L.A. Girl fineline liquid liner in black and I lined my upper lash line. Then I went back to my vanity palette, and taking the same eye brush I used the matte brown on the left side of the palette and I placed this shade close to my lash line where I just put the liner. Then I took a fluffy crease brush and blended everything out. I finally finished the look with my covergirl professional all in one mascara in blackest black, I placed this on my top and bottom lashes.


And thats it! Its pretty simple, but yet I believe very put together. I hope you enjoyed this tutorial! Please feel free to try this look out using whatever products you have. I hope you guys will try this out :) Let me know if you like it :) Also please let me know if you like these tutorials, I love doing them, but I want these posts to be enjoyable for you to read so please let me know if you like these tutorials in the comments section.  Have a great day everyone!